Turn DTF Printing Into Profit: A Guide for Small Business Owners
In the ever-evolving world of custom vesture and cloth decoration, DTF Printing (direct to film) has made a dramatic entrance.
Unlike traditional printing styles that calculate on heat transfer paper or vinyl slices, DTF offers a fresh, dynamic approach. By combining full-color inkjet printing, special tenacious coatings and heat pressing, it delivers vibrant, durable designs suitable for a wide variety of fabrics.
Whether you’re starting a small business, passionate about custom products, or experienced in printing, learning how DTF works can give you a valuable edge in the market
This guide breaks down everything you need to know, from how the process works to stylish practices, business perceptivity, and unborn trends.
How DTF Printing Works
1.Design & Prepress
Kick off your project by crafting a custom digital design with creative tools like Adobe Illustrator or CorelDRAW, where your vision starts to take shape.
The design is flipped because it will be printed in reverse onto the fabric.
The printer uses CMYK colors plus white ink.
White ink is added first to make colors show up better on dark fabrics.
2.Inkjet Printing onto Film
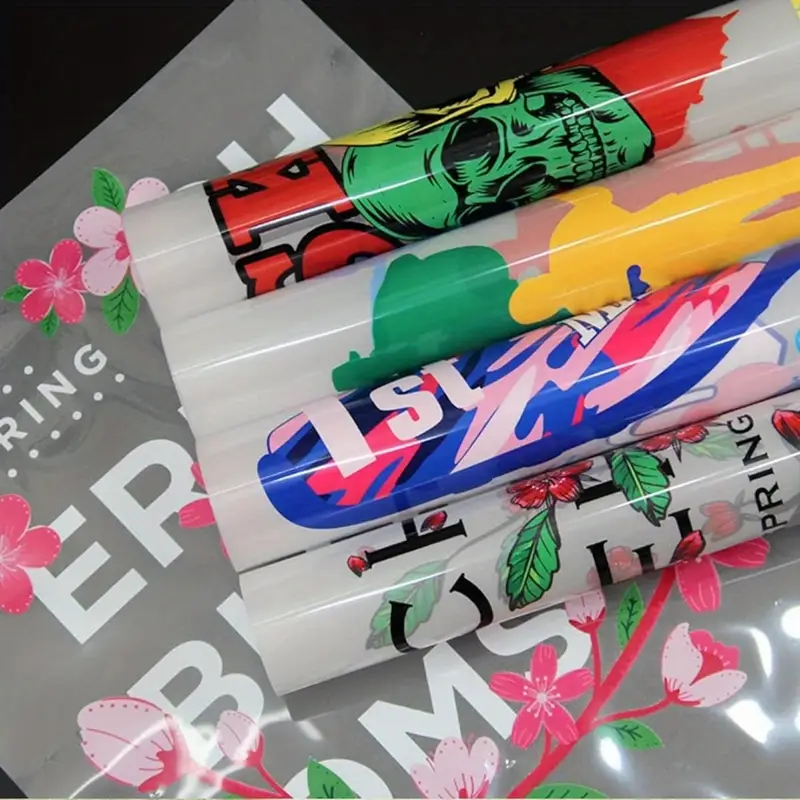
Special DTF printers use fabric-friendly inks, usually eco-friendly or water-based, and print directly onto a film.
The film is made of PET and has a special coating to hold the ink in place until it’s transferred.
Designs can range from tiny logos to full-front prints that span the entire shirt.
3. Adhesive Powder Application
With the ink still wet, a light dusting of adhesive powder clings to the design, forming an instant bond. As the film begins to dry, the excess powder is carefully removed, ensuring only the perfect amount remains for a smooth, flawless transfer.
4. Curing & Powder Melting
Steady low heat gently melts the adhesive powder, forming an even layer that locks the ink onto the film for a strong, long-lasting finish.
Effective curing is essential—it reinforces the adhesive bond and helps prevent flaws like patchy prints, peeling, or color fading.
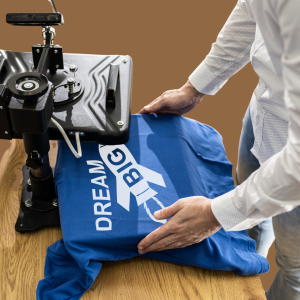
5. Heat Transfer to Garment
Place the printed film face-down on the fabric.
Apply firm heat using a press set to 160–170°C (320–338°F) for 15–20 seconds to firmly embed the design into the fabric
Apply firm pressure (about 50–80 psi).
After pressing, peel off the film—either while it’s still hot or after it cools, depending on the fabric.
6. Finishing & Post-Press
To make the print softer and longer-lasting, do a quick second press for 5–10 seconds.
Let the fabric cool, then check for any mistakes or parts that didn’t transfer well.
A wash test is a good idea—properly cured DTF prints usually hold up in machine washes at 40°C (104°F), or even 60°C (140°F).
Advantages of DTF Printing
1. Works on Many Materials
DTF printing can be used on almost any type of fabric—like cotton, polyester, blends, nylon, leather, neoprene, and even hard surfaces like wood or ceramic (with the right coating).
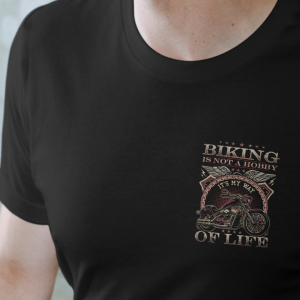
2. Bright & Long-Lasting Prints
Prints come out vibrant, detailed, and smooth, with rich colors and soft gradients. The ink sticks well and holds up against cracking and fading, even after multiple washes.
3. Easy to Set Up
No screens or vinyl cutting needed. You can print designs directly and on demand—great for small orders or custom pieces.
4. Better Inventory Control
Perfect for print-on-demand businesses—there’s no need to keep a large stock of pre-made designs.
5. Soft & Stretch-Friendly
The transfers are thin and flexible, giving a soft feel on the fabric. They move well with stretchy materials like sportswear or yoga clothes.
6. Cost-Effective for Small Batches
DTF is more affordable than screen printing for smaller orders (under a few hundred prints) because it avoids expensive setup costs.
Challenges & Considerations
1.Equipment Costs
Starting with DTF can be expensive. Good printers, dryers, heat presses, and powder shakers can cost between $3,000 and $15,000 or more.
2. Material Quality
Using cheap films, inks, or powders often leads to fading, poor sticking, or extra mess. It’s better to invest in high-quality supplies for long-term success.
3. Learning Curve
You’ll need to learn the right settings for ink use, powder amount, curing time, and pressing. This takes practice and training.
4. Safety & Ventilation
Proper ventilation is important—especially when using eco inks. Some areas may require masks if you’re working with certain powders.
5. Color Accuracy
Getting exact color matches takes skill. You’ll need good color profiles (ICC) to avoid differences between what you see on screen and what’s printed.
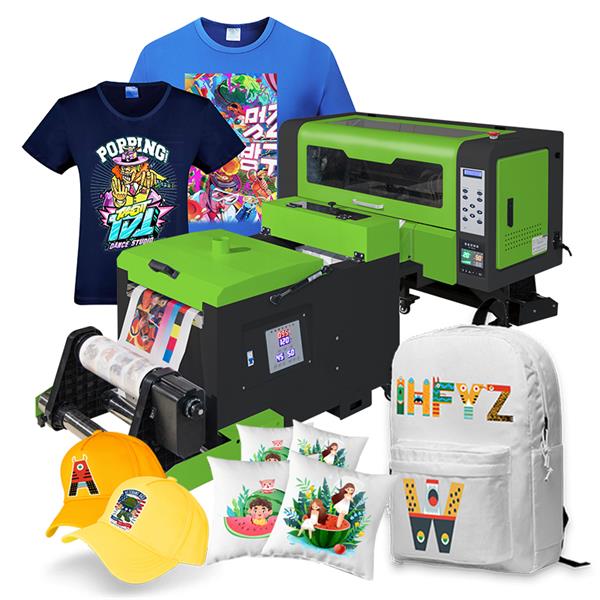
Equipment Checklist
To set up a DTF printing system, you’ll need:
- DTF Printer: Comes in desktop or large roll versions (A4 to 1.5 meters wide). Epson-based models are popular.
- Film & Transfer Supplies: PET film, glue powder, and cleaning tools.
- Ink System: CMYK and white ink (used more on dark fabrics).
- Drying & Curing Unit: Low-heat oven or dryer to melt the glue powder properly.
- Heat Press: Manual or automatic press; pneumatic presses are faster for big jobs.
- Finishing Tools: Scales, powder shakers, lint rollers, heat gloves, tape guns.
- Software: RIP software like CADlink, SuperRIP, or Wasatch helps manage colors and print quality.
Best Practices
- Use Quality Supplies – Good film, powder, and inks give better results and happy customers.
- Adjust Heat Press Settings – Test for the right heat, pressure, and time, especially for sensitive fabrics.
- Keep Workspaces Clean – Dust, oils, or powder can ruin prints.
- Maintain Equipment – Clean printer heads and dryers regularly. This avoids breakdowns and keeps quality high.
- Store Materials Properly – Keep films flat and inks in a cool, dry place.
- Pre-Press Garments – Lightly press wrinkled or damp fabrics before transferring.
- High-quality DTF prints can withstand 50 to 80+ washes without fading or cracking
- Use Color Profiles – Proper profiles ensure your print colors match your screen design.
- Handle Transfers Carefully – Let the film cool flat. Don’t fold or bend before use.
- Update Software – Keep your printer software and RIP tools updated for better color and performance.